
Its natural to be wary of making your own sushi. Fish and other seafood have a nasty reputation for carrying unwanted bacteria (and in the case of some shellfish, viruses such as hepatitis). Now, that reputation, while partly true (fish will spoil much quicker than other meats) is also less of a concern now due to the rising quality of fish available in your local market. If I have some extra money in my budget, I'll go to Whole Foods and chat with the people at the fresh fish bar to see what they recommend as the freshest fish. And when I don't have that extra freedom, I go the faux-crab and smoked salmon route. And there's always vegetarian sushi.
So how do you make sushi? What kind of expensive or odd equipment do you need? And what bizarre and expensive do you need to buy? Well, let me set your fears at ease: Sushi is easy to make, using simple (cheap) base ingredients and the utensils and equipment you probably already have in your home! Below I'll show you how I do it and how simple it can be for you too.

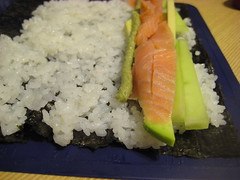
The basic ingredients that I used are shown above: cucmber, avocado, left over smoked salmon, and faux crabmeat. In the background in the bag are sheets of nori, pressed sheets of algae (its not seaweed actually) that you wrap the roll in.
1. Step one is to make your rice. You'll want a high quality sushi/short grain rice that has been well rinsed to removed the dust that will naturally accumulate. Place 1 cup of rinsed rice in a pot with 1 cup of water and bring to a boil. Once it does, drop the heat to low and cover. After 15 minutes remove from the heat completely and let the rice sit for 10 minutes. During that 10 minute rest, place 1 tbsp of rice vinegar and 1 tbsp sugar in a small dish with a small pinch of salt and microwave for 30 seconds. After the 10 minutes, transfer the rice to a bowl (preferably wood, glass, or stainless steel in that order) and pour the vinegar over the rice. Using a wooden spoon, mix up the rice to get it all coated and quickly cool it to room temp.

2. Once the rice is done, the rest of the job is assembly. Place a sheet of nori on a flexible silicone baking mat and cover all but a 1 inch strip at the end farthest away from you with rice.

3. Lay down your ingredients at the end closest to you, making sure not to add too much or else you'll overload the roll.
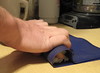
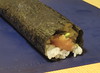
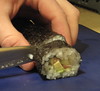
4. Using the mat, roll the end with the ingredients over onto itself, pushing excess mat ahead of you. Keep even and firm pressure on the roll, moving your hands to the edges slowly from the center with each roll. Once you've reached the end, use your fingers to firmly push on all sides to get the nori wet from the rice, which is what will seal the roll closed. Use a long, thin bladed knife and a short sawing motion to slice the roll into roughly 1/2" sized pieces.

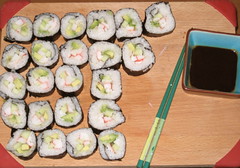
To serve, do it however you want and will enjoy it. I prefer the dish of soy sauce with some wasabi mixed in route.
If you don't have a silicon baking mat, you could probably get away with using a sheet of parchment paper. There absolutely no need to have a specialty bamboo mat that you'll rarely use. And don't even bother with those kits that sell for $50 or so that claim to give you everything you need and will ever want. The rice can be bought in bulk from Whole Foods for cheap, nori is fairly inexpensive (especially if you buy it at an asian market), and you can dictate how much you spend on the fish depending on what you want to buy. So if you've ever thought of making your own sushi but were either too afraid to try it, or didn't want to deal with specialty equipment and ingredients, take heart, its not the big mystery your local sushi restaurant wants you to think it should be.
I'm on break till the end of the year to see family, so posting might be light, so I'll take the opportunity now to say Happy Holidays everyone!


3 comments:
Mike, I am greatly enjoying your posts so far, especially since they have lots of pictures. I can´t wait to give some of your recipes a try when my facilities aren´t quite so rustic, and when my tummy is back to good (I am fairly certain I have developed lactose intolerance). Anyways, I dearly miss sampling your confections, and if I could, I would liek to request a peace corps-proof recipe, something that (and here I get demanding) needs no refrigeration or expensive or illusive ingredients or tools, requires few ingredients, can be prepared over a camp stove, and, sadly, lacks dairy. Thanks so much and happy holidays!
why do I look at that and think I CAN DO THAT and then think Id so make a mess :)
but I shall try anyway---I dont mind eating messes.
This post is very informative among many other sushi making instructions found on the net.
Thanks.
Post a Comment