
After a long period of having to do a ton of other things than cook/prepare blog worthy dishes, I now have at least a short respite to post some new items. But the weather, why am I bringing that up? Because it's winter, and that means two culinarily important things, fresh local fruits are pretty much nonexistent, and the air is cold and dry. What does latter part have to do with anything? Well, this post is about fudge, so the air is almost as important a factor as the ingredients. You see, fudge is mostly sugar, and sugar likes water. Fudge, however, does not like water. Traditionally, sugar based candies were made during the winter months when the air was devoid of pretty much all moisture (as I'm sure you skin can probably attest) to prevent the resulting product from getting soggy and grainy. That means that now is the perfect time to whip up some lollipops. However, I'm still a bit gun-shy after my last encounter with 305° liquid sugar, so I decided to stick to the cooler, safer "soft ball" stage, and that means fudge!
I based this recipe on Alton Brown's chocolate fudge recipe because I like it and generally have found his sugar cooking method the be the most fool proof. Alton's sugar method is fairly straight forward and I highly suggest it for any sugar cooking you do, be it for fudge, toffee, caramels, or lollipops. His technique features two main points, use a cast iron pot or griddle below your pot to evenly distribute the heat as well as keep the temperature well regulated, and right when the sugar hits a boil cover it with a lid for a short period to prevent crystallization along the sides of the pot. Use those two tips, and you'll rarely have problems working with your sugar.
Now, just a heads up, this recipe is big, I'm talking you could use this scale to set up a small fudge shop if you wanted. Fortunately, you can easily divide it in half to make it more manageable, both on your kitchen and your waistline. But I'm sure your coworkers wouldn't mind if you happened to bring in 3 lbs. of delicious fudge for them to enjoy...
Maple Walnut Chocolate Fudge:
5.5 cups sugar
8 oz. unsweetened chocolate
6 tbsp butter
1.5 cups 1/2 and 1/2
1 cup real maple syrup
2 cups walnuts
2 tsp vanilla
- Put your pot on a cast iron or similarly heavy metal pan or griddle to create a good heat sink/distributor. Take a 9"x15" glass baking dish and line with parchment (adhere parchment to sides by either buttering up or spraying with no-stick spray). Add the sugar, 1/2 & 1/2, maple syrup, and half of the butter into the pot and turn the heat to high. Stir till the sugar and everything else is completely dissolved.
- When the sugar begins to boil, drop the heat to medium, put on a lid, and let sit for ~3 minutes. After 3 minutes, remove the lid and attach your candy thermometer. Keep cooking, without stirring!, over medium high heat till the temperature reaches 240°F. At that point turn off the heat, add the remaining butter, and let sit undisturbed till the temperature comes down to around 150°F.
- While the mixture is cooling, toast the walnuts for ~10 minutes in a 350°F oven, tossing occasionally. Chop the nuts roughly. When the temperature of the mix is below 150, pour in the nuts and vanilla and stir vigorously with a strong (preferably wooden) spoon. When the fudge gets very difficult to manipulate, pour into the prepared pan and spread out with a silicone spatula.
- Allow to cool for a good 2 hours at room temperature before attempting to cut into 1" cubes. Store fudge in an air tight container or put in small bags to give away to coworkers.
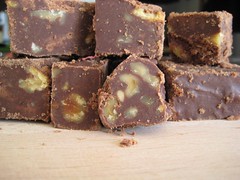

That's only 1/4 of what this whole recipe makes!
So that's my maple walnut chocolate fudge recipe for you! As you can see, each piece has a nice distribution of nuts, and the maple syrup gives a subtle background flavor that complements the nuts and the chocolate. I'd recommend using grade B real maple syrup. It's more expensive than imitation, but the flavor is stronger and far superior. You should be able to find larger bottles for less than $20 at Whole Foods or similar markets, which is much better than the small, overpriced bottles you find in your local supermarket.
Well, that's all for now. I plan on being back with another recipe within the next week or so.
Cheers,
Mike :)


No comments:
Post a Comment