Monday, June 22, 2009

Blackened fish sandwiches

Ok, so firstly, I apologize for not posting sooner. One of the problems with being an ambitious cook is that often I'll get too ambitious for my own good. So, in the past three weeks I've learned that I'm really bad at trying to make donuts, that "elaborate" sugar crafting is best left to professionals/those with proper kitchen space, and that chili oil turns very quickly into home made tear gas if used inappropriately. Oh well, live and learn. I'm still waiting on my beer to get to its final stages so I can bottle it and do a full write-up on that, so I decided that I should go for something relatively easy that I knew I wouldn't burn my house down attempting.

Its no secret that I like seafood, so every time I go to the supermarket I swing by the fresh fish case and see what's on sale and if there's anything good on managers special. This past week I found two whole fillets of steelhead trout (the ocean caught form of rainbow trout) for $5 on special, so I picked them up with some nice ciabatta rolls and went home planning out a fish sandwich in my head. I didn't want to fry it, but I did want the fish to be a little crispy without being dried out. Some spice would be a nice touch too since trout is a little bland for a red fleshed fish (in my opinion at least). I settled on making the classic blackened fish and serving it with a nice and spicy mayo on the ciabatta rolls.

Blackening spice can be many things, but generally is based off a combination of paprika (which burns easily) and other spices that will form a dark(burnt) crust on the outside of a piece of meat (generally fish but also chicken, occasionally beef). As with anything, you can buy it pre-made, but you're really better off making it yourself from what you have in your spice rack. A decent base "recipe" is below, but feel free to experiment. Depending on what meat you have on hand, you may want to add more or less of certain spices to augment or accent what you have.

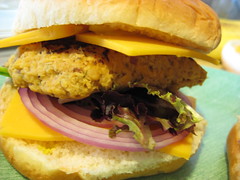
Blackened fish sandwiches:

2 tbsp. paprika
1 tsp. black pepper
1/2 tsp. onion powder
1/2 tsp. garlic powder
1/2 tsp. cayenne pepper
2 fish fillets (abt. 3 inches wide)
2 rolls of your choice
cheese slices, cheddar is a good choice
assorted greens, onion, pickles, cheese for dressing
1/4 cup mayo (store bought or home made)
2 tsp. chipotle tabasco (feel free to use less)
1 tbsp. dill weed
2 tbsp. butter
  1. Combine the paprika, black and red peppers, and onion and garlic powders in a jar or small dish and mix thoroughly.
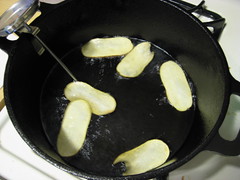
  2. Pat the fish or other meat dry and rub liberally with the spice mix to coat. Put a skillet (preferably cast iron) over high heat and add the butter.
  3. Just as the butter begins to burn, add the filets and cook on each side for roughly 1-2 minutes per side (fish is quick, chicken will take longer, don't give yourself food poisoning...). Remove from the pan and set on some paper towels to remove some of the excess fat.
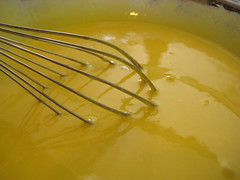
  4. Mix the mayo with the chipotle tabasco and dill weed and spread some on each side of the roll/bun. Add the cheese, some greens and onion (I added some pickles to cool it down more since I used more cayenne) and lay the fish on top.
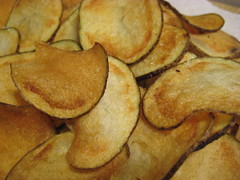
  5. Enjoy with some chips and a nice cold beer.


    Library - 1038
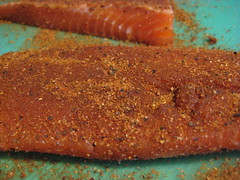
    The trout, liberally seasond, before meeting the hot pan.

    Library - 1039
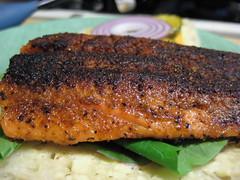
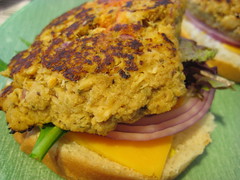
    The fish after the pan. Note the nice black crust on top.


    Now, for some people, thats a rather light blackened fish, and I'll admit that that's a somewhat true assessment. Traditionally you would want your pan raging hot over full heat and use pre-melted butter as lubricant. Not wanting to risk full fledged firey chaos, I toned the temperature down some. You don't get the sides as dark, as you can tell, but you avoid having to meet your local fire crew on less than ideal terms (although I'm sure they're great).

    One issue some people may have to this recipe is the natural aversion to eating burnt things. Over cooked burgers, failed Thanksgiving turkeys, pies forgotten in the oven, the record of "burnt" food is pretty poor. The beauty of blackened foods, though, is that the spices were purposely chosen for their low burning temperatures. Combined with the milk solids present in the butter (which is why butter is used to do this), you end up getting a burnt crust that actually protects the meat from drying out and burning itself. The result is a juicy, fully cooked inside, with a crispy spicy outside.

    Ok, so there's a recipe. I've got some less outlandish ones in the pipeline now that I pretty much know will work, and my beer should hopefully be done in another week or so, so look out for that one.

    Cheers,
    Mike

Monday, June 1, 2009

Salmon Burgers

Having been born and raised on the east coast, seafood was a normal part of my diet. I can remember quite fondly going to Long Island to see my grandparents, going out to some restaurant that may or may not exist any more, and surprising my grandfather as I ate all sorts of assorted sea creatures with nary a thought. At family gatherings, if there was a fish on the menu, it was usually on my plate. I'm fairly certain that out of nearly 30 some odd dinners on cruises, I had seafood as my main course for at least 25 of them. Mako shark, swordfish, whitefish, red fish, squid, octopi, clams, mussles, oysters, shrimp, crabs, lobster, frogs (not technically seafood but aquatic none the less) I've eaten and enjoyed them all (some more than others depending on how they were cooked).

So, imagine my sense of awe when 5 years ago I went to visit Oregon State University in Corvallis, and discovered the salmon burger. All I could say was "where have you been all my life!?!" Thankfully, with the rise of Trader Joes, Whole Foods, and even the organic section of your local grocer, these tasty treats are available nearly every now. Unfortunately, I'm still a grad student on a budget, and paying $6 for 4 burger is a little steep. So channelling all of the culinary MacGyver vibes I could, I set out this weekend to make my own.

TbF Images - 309


It may not be the prettiest girl at the ball, but I wouldn't have any other. (Ok, I'd never pass on a store bought one, but thats not the point here). They're rather like making normal hamburgers from ground beef, only different. Since beef has lots of fat, its normally pretty sticky. Salmon is much much leaner, so you'll actually need to add some fat in to help bind things together. Don't worry though, as opposed to the saturated fats in beef, we're going to stick to relatively healthy olive oil. Combine that with the health benefits salmon normally brings to the table, and I think salmon burgers should be looked at as the new replacement for the hamburger. Or not...

Salmon Burgers:
1/2 pound chunk salmon, de-boned and de-skinned
1/4 cup red onion, finely diced
1/4 cup prepared mustard (coarse grain or dijon is best)
2 tbsp. ketchup*
2 tsp. prepared horseradish*
2 tbsp. olive oil
1/4 cup panko bread crumbs
1 tbsp. mustard powder
2 tsp. dill weed
1 tsp. celery seed
1 tsp. salt
1 tsp. ground pepper

*You can use cocktail sauce instead of the ketchup and horseradish if you prefer
  1. Shred salmon into fine pieces with a fork, or pulse quickly in a food processor.
  2. Add the onion and spices and combine thoroughly. Its easier to get all of the salmon integrated with the spices now than after adding the wet works.
  3. Add the wet ingredients, mixing thoroughly. Work the panko in with your fingers to distribute.
  4. Using your hands, grab a bit of the salmon mix just bigger than a golf ball and form into a pattie in your hands. Place on a square of parchment or wax paper, lay another square on top, and continue till you've used up all the mix. Freeze all of the patties you don't plan on using right then.
  5. To cook, heat a griddle pan over medium heat and lightly spray with no-stick spray. When the pan is hot, add the pattie and let cook for about 2-3 minutes a side. Salmon, being a lot lighter than beef, cooks much quicker and you don't want to cook it to the point of drying out. Serve on a bun with a little lettuce, an onion slice, some cheddar, and either some mustard or cocktail sauce (or both!).


TbF Images - 305
Ok, it does look a bit like cat food, but then again, ground beef doesn't look that appetizing when sitting raw in a bowl either.


TbF Images - 308
Fresh off the griddle, prior to being crowned and consumed.


While these may never replace that memory of the first time boy met salmon burger, for being a lot less than 50 cents a piece, I'm perfectly happy with how these babies turned out. And with the money I'm now saving by not buying salmon burgers from Whole Foods, I can afford to make a new beer! Yup, you heard me right, I'm making a new beer, and this time its not from a kit, so be prepared for some home brewing related posts coming up soon.

Cheers,
Mike

Sunday, May 17, 2009

Tabbouleh

So, my last couple of posts have mostly centered around generally unhealthy foods (potato chips, ice creams, tempura, mac & cheese, etc.). And while all those foods are great, they are generally lacking when it comes to the type of balanced nutrition that active people really need to keep themselves going. Fortunately, the focus of this post is on an incredibly healthy and extremely tasty dish from the middle east that also happens to be rather popular in some South American countries as well. Its tabbouleh!

Tabbouleh is made with an odd form of wheat, bulgur, thats been parboiled, dried, and packaged. The parboiling means that it cooks quickly later and since its a whole grain it packs a nutritional wallop, so its super quick and healthy. Along with the bulgur, tabbouleh combines massive amounts of parsley, some mint, some tomatoes, green onion, spices, and a very light splash of olive oil and lemon juice. Since I pretty much just gave you the ingredients, I'm going to do the method mostly in pictures.

Step 1: Add 2 cups of water to 2 cups of bulgur wheat. Let the bulgur soak up all the liquid, it will take about an hour.
TbF Images - 282


Step 2: While the bulgur is doing its thing, chop up two firm tomatoes finely, almost as fine as like making salsa.
TbF Images - 279


Step 3: Throw a whole bunch (literally, one whole bunch from the supermarket) of parsley and a small handful of mint leaves into your food processor and pulse till finely chopped.
TbF Images - 280


Step 4: Slice up 4 or 5 green onions.
TbF Images - 281


Step 5: Combine all of the above and 1/2 tsp. sea salt, 1/2 tsp. freshly ground pepper, and 1/2 tsp. cumin. Let sit refrigerated for an hour to get the flavors mingling.
TbF Images - 283


Step 6: Add 1/4 cup olive oil and 1/4 cup lemon juice, mix thoroughly, and either serve straight away or keep in the fridge for up to a week. I eat my tabbouled like a dip with some pita flatbread that you'd use for an gyro, but the traditional method is in a lettuce leaf. Either way its darn good.
TbF Images - 287


You may notice that after the bulgur has soaked up all the original liquid, its still a little hard. Don't worry, after you mix everything else in and let it sit, it will come out nice and chewy in the end. Aside from having a high amount of fibre, there's a decent amount of iron and other minerals which makes tabbouleh a great way to even out the deficiencies of the rest of your diet. It may not take the place of a full meal, but it would make a wonderful afternoon snack or accompaniment to a sandwich for lunch. Really, no matter where you include tabbouleh in your diet, you can't really loose.

Cheers, Mike

Sunday, May 10, 2009

Chips, Kettle-esque

Potato chips have become something of an oddity lately. Mass marketed for decades as an increasingly inferior and unhealthy snack food, they've recently moved upscale with the advent of small batch "boutique" brands using different cooking methods, oils, and potatoes. In the end though, they're still the same thinly sliced fried potato product originally developed back in 1853. What's the real shame with current mass market potato chips though is that no matter how hard you try, you'll never get a bag that tastes as fresh as when they're straight from the fryer. So I'm here to help everyone experience that little bit of joy.

Home Made Potato Chips:
2 qts. frying oil
4 large russet potatoes (cleaned and dried)
salt or other seasonings
  1. Slice the potatoes as thin as you can get them with a large, sharp knife, or to the thickness of a dime if using a mandolin. Spread the slices out onto some paper towels and heat the oil to 350F.
  2. When the oil is at the right temperature, add 8 or so slices at a time and keep them moving with a fine mesh strainer. It will take about 3-5 minutes for them to turn nice and golden brown. At that point transfer the chips to a bowl lined with some paper towels and toss to remove excess oil. Sprinkle in your seasoning and then transfer to some paper towels on a counter.


TbF Images - 273
Potato slices before frying.

TbF Images - 271
Frying up long cut slices, they carry more seasoning.

TbF Images - 274
Freshly fried chips, lightly seasoned with sea salt, seconds before being consumed.


As I said in previous posts, once I've got my dutch oven filled with oil, I know I have another 3-4 fry sessions left before the oil should be discarded (or turned into biodiesel, but thats not my area). Since its a pain to filter and store it in between these runs, I enjoy finding excuses to fry things since it's not one of my standard cooking methods. These chips went perfect with the hotdogs and cole slaw I had for dinner earlier this week. Unfortunately for my taste buds, but fortunately for my waistline, this was the final session with this oil, so I doubt I'll be deep frying anything else for a little while. But that means more variety of recipes for you guys, so there's some good that comes out of it.

Cheers, Mike

Sunday, May 3, 2009

Coffee ice cream

Who says you can't have ice cream for breakfast? Since bacon and eggs ice cream doesn't sound too appealing (although it has been done and I've never actually tried it) I think I'll stick with coffee ice cream for now (full disclosure, this past week my breakfast consisted of raspberry acai sorbet, but thats healthy because it has fruit... right?). Now, most coffee ice cream recipes I've seen say something along the lines of make your standard vanilla ice cream custard base, then add some espresso powder or instant coffee before you pour the mix into your ice cream makers. I thinks that's simply cheating... coffee ice cream should have coffee as its main ingredient and not an afterthought! The problem, though, is that coffee as you drink it is really just water, and adding coffee grounds to an ice cream base would result in a grainy, disgusting disappointment.

This is where a little science comes into play. You see, when you brew coffee normally, you're using heat as part of the mechanism for extracting all of the lovely flavors and aroma's that you expect from a normal cup of coffee. The reason isn't so much because heat is the best method for doing so, its simply because we don't feel like waiting. Heck, espresso was invented simply as a method for making coffee even faster than it already took. But if we have some time on our hands, we can achieve the same results without heat. And without relying on heat, we no longer need to stick to water as our sole extraction liquid. Now, you may be thinking that I'm suggesting alcohol, and you can extract flavors this way, which is how vanilla, mint, nut, and numerous other flavorings are extracted. But I figured why add more ingredients than necessary, infuse the milk!

Thats right, I directly infused the coffee into the milk before making the custard base. Its similar to cold brewing coffee but takes twice as long and obviously needs to be done in the fridge. Using whole milk over half and half sacrifices some of the richness that you lose from having less fat, but makes filtering later much easier and quicker. As far as purity goes, its hard to beat a recipe that has only 5 ingredients.

Coffee Ice Cream:
2 qts. whole milk
2 cups coarsely ground coffee
6 egg yolks
2 cups sugar
1 good pinch salt
  1. Add the coffee grounds to the milk in a big enough container (a 1/2 full gallon jug of milk works best) and place in your fridge for at least two days, giving it a shake every few hours if possible. After the infusion period (mine was 4 days simply because it was, 2 days works just as well) strain the milk through a coffee filter into a receiving container and then transfer to a large sauce pan over medium-low heat.
  2. Add the egg yolks, sugar, and salt in a heat proof work bowl and whisk until creamy. Add 1 cup of the warm milk slowly to the eggs while constantly whisking to temper. Add one more cup of warmed milk, whisking till thoroughly combined and then pour the whole mix back into the sauce pan.
  3. Heat over medium-low heat until the mixture gets thick enough that it will coat the back of a spoon and drawing your finger through it will leave a clean area. This is the standard custard method for ice cream bases so learn to recognize this point. When thickened, pour the custard through a fine mesh strainer into a large enough container and chill in your fridge for a few hours.
  4. Pour the chilled custard mixture into your ice cream maker and let it go for about an hour or follow the manufacturers instructions. Pack into containers and put in your freezer to harden.

TbF Images - 269
Whisking the eggs and sugar before adding the heated milk to temper. Be careful to slowly add the heated milk so you don't make scrambled eggs!

TbF Images - 279
Small scoops may disappoint some, but see below for my ultimate serving suggestion.


So, there we go, coffee ice cream without resorting to espresso powder or instant coffee. The direct infusion of the milk method works for other flavors as well, but thats another post now isn't it. As I said above, this is the perfect excuse for any coffee drinker to have ice cream for breakfast, but what about those who just can't get the day started without a stop at Starbucks? Here's my advice: get a small coffee cup (or a large one if you really wish) and fill it with small scoops of coffee ice cream. Drizzle caramel syrup and hot fudge on top, then add some chopped walnuts and a dollop of whipped cream. Voila, turtle mocha sundae! Now thats a cure for a case of the Mondays.

I've got a whole back-log of ice cream recipes now, but I'll try to space them out with some other tasty items.

Cheers, Mike.