Monday, June 29, 2009

Pho: rice noodles in beef broth

Ok, so really, this is an imitation pho. Traditional pho is a dish of rice noodles and thinly sliced steak in a beef broth that takes a good 1/2 day to prepare. Kind of kills the whole mythos of asian cuisine as being fast (don't worry, its still fairly cheap!). Ordering it from a take-away restaurant is an option, but you'll pay more than if you made it at home and you know you'll only be tempted to order some egg rolls or other unhealthy "sides" to go with it. The solution, of course, is to make your own pho at home, and cheat a little in the process.

As I just alluded to above, the beef broth for pho is normally a home-made stock, traditionally using oxtails as the base (you may have noticed that I switched terms there. I define stock as a liquid made from the meat and bones of an animal, and broth as any flavored liquid that accompanies other additions. So in this case, the end result is a broth that's made using stock. Its a little odd, I know.). I'm not ashamed to admit that in this case, I cheated and used a packaged beef stock. Kitchen Basics Unsalted Beef Stock to be precise. Why did I go with that brand and type? Simple, I wanted a base that I could easily and quickly work off of, and unsalted beef stock is about as plain vanilla as you can get after water. It also means you can do small batches of pho quickly and easily because of the nifty re-sealable packages.

The basic idea here is to prepare the noodles and assorted additions (more on this later) while heating up the broth, then combine them all in a bowl. Since I already said unsalted beef stock is pretty plain, you'll need to make some additions of some veggies and spices while heating it up to get a good and rich broth. I used some "fancy" mushrooms, as the local supermarket calls them (wood-ear, enoki, shitake, really not that fancy), but you can use "normal" mushrooms. Combine them mushrooms with some chili paste and sliced onion, heat them thoroughly, then add in some steak and the stock. By the time it comes to a boil (which you'll want it to) the flavors will have been beefed up (an unintended pun, ha ha...) sufficiently. Its really quite simple and takes about a half hour.

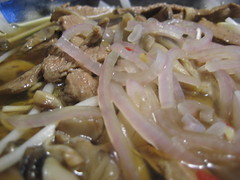
Pho: rice noodle and beef broth soup
1 container unsalted beef stock
4 oz. flank steak (or similar quality beef)
6 oz. mushrooms, sliced into small pieces
1/4 onion, finely sliced
salt as desired
1 tbsp. chili paste
1-2 tsp. olive oil
1/4 lb. rice noodles
additional stuff such as bean sprouts, basil, cilantro, sliced jalapenos
  1. In a large enough pot over medium heat, add the oil and chili paste. When the oil is hot enough, add the onions and mushrooms. Cook until the onions are translucent and the mushrooms have given back the moisture they absorbed when first added.
  2. Salt the steak liberally and let sit for ~5 minutes (this seems odd but its the only time salt is added so don't be shy). After the 5 minutes, slice the steak thinly and add to the pot along with the stock. Turn the heat up to high and bring to a boil.
  3. While the broth is coming to a boil, soak the rice noodles in cold water for ~15 minutes. Bring another pot of water to a boil and add the noodles and cook for 3-5 minutes maximum (over cooking will turn the noodles into a gummy mess).
  4. Drain the noodles and add to the bottom of a bowl. Add whatever additions you'd like and fill up with the boiling hot broth, making sure to get some mushrooms, onion, and steak in as well. Serve with a wedge of lime and some hot sauce (Sriracha work best in my opinion).


TbF Images - 315
Noodles on bottom, with chard, bean sprouts, steak, and mushrooms piled on top before adding the broth.


TbF Images - 316


As you can tell, this is a pretty simple dish, and pretty easy and quick to make if you cheat like I did. The salting of the steak before adding it to the pot may seem odd to many, but there's a very good reason for doing it that way. The first is that directly salting the meat will help break down the fibres in lower quality cuts, making them more tender in the end. The second reason is it pulls some of the juices out of the meat, and brings the salt in. This gives the meat itself some more flavor that you'd lose because of the short cooking time (if you salted the broth directly, the meat would loose a lot of flavor).

Now, as I noted, you can use all sorts of "additions" to your pho. The traditional ones are basil, cilantro, bean sprouts, sliced chilis, and a lime wedge. For the picture above, you can see (well, more read) that I used some chard from my garden. I just tore it into small pieces and added it directly to the bowl before adding the hot broth. Similar substitutions are more than accepted. The only thing you'll want to make note of is that you don't want to add a lot of cold/room temp. ingredients as it will cool the soup down too quickly (rice noodles get cold fast). Aside from that, feel free to experiment with what you have on hand. I'm pretty sure I'll be forced to add some zucchini in a few months.

So, I'm a day later than I hoped for, but I will promise a post in the next few days again. Cheers for now,
Mike

Monday, June 22, 2009

Blackened fish sandwiches

Ok, so firstly, I apologize for not posting sooner. One of the problems with being an ambitious cook is that often I'll get too ambitious for my own good. So, in the past three weeks I've learned that I'm really bad at trying to make donuts, that "elaborate" sugar crafting is best left to professionals/those with proper kitchen space, and that chili oil turns very quickly into home made tear gas if used inappropriately. Oh well, live and learn. I'm still waiting on my beer to get to its final stages so I can bottle it and do a full write-up on that, so I decided that I should go for something relatively easy that I knew I wouldn't burn my house down attempting.

Its no secret that I like seafood, so every time I go to the supermarket I swing by the fresh fish case and see what's on sale and if there's anything good on managers special. This past week I found two whole fillets of steelhead trout (the ocean caught form of rainbow trout) for $5 on special, so I picked them up with some nice ciabatta rolls and went home planning out a fish sandwich in my head. I didn't want to fry it, but I did want the fish to be a little crispy without being dried out. Some spice would be a nice touch too since trout is a little bland for a red fleshed fish (in my opinion at least). I settled on making the classic blackened fish and serving it with a nice and spicy mayo on the ciabatta rolls.

Blackening spice can be many things, but generally is based off a combination of paprika (which burns easily) and other spices that will form a dark(burnt) crust on the outside of a piece of meat (generally fish but also chicken, occasionally beef). As with anything, you can buy it pre-made, but you're really better off making it yourself from what you have in your spice rack. A decent base "recipe" is below, but feel free to experiment. Depending on what meat you have on hand, you may want to add more or less of certain spices to augment or accent what you have.

Blackened fish sandwiches:

2 tbsp. paprika
1 tsp. black pepper
1/2 tsp. onion powder
1/2 tsp. garlic powder
1/2 tsp. cayenne pepper
2 fish fillets (abt. 3 inches wide)
2 rolls of your choice
cheese slices, cheddar is a good choice
assorted greens, onion, pickles, cheese for dressing
1/4 cup mayo (store bought or home made)
2 tsp. chipotle tabasco (feel free to use less)
1 tbsp. dill weed
2 tbsp. butter
  1. Combine the paprika, black and red peppers, and onion and garlic powders in a jar or small dish and mix thoroughly.
  2. Pat the fish or other meat dry and rub liberally with the spice mix to coat. Put a skillet (preferably cast iron) over high heat and add the butter.
  3. Just as the butter begins to burn, add the filets and cook on each side for roughly 1-2 minutes per side (fish is quick, chicken will take longer, don't give yourself food poisoning...). Remove from the pan and set on some paper towels to remove some of the excess fat.
  4. Mix the mayo with the chipotle tabasco and dill weed and spread some on each side of the roll/bun. Add the cheese, some greens and onion (I added some pickles to cool it down more since I used more cayenne) and lay the fish on top.
  5. Enjoy with some chips and a nice cold beer.


    Library - 1038
    The trout, liberally seasond, before meeting the hot pan.

    Library - 1039
    The fish after the pan. Note the nice black crust on top.


    Now, for some people, thats a rather light blackened fish, and I'll admit that that's a somewhat true assessment. Traditionally you would want your pan raging hot over full heat and use pre-melted butter as lubricant. Not wanting to risk full fledged firey chaos, I toned the temperature down some. You don't get the sides as dark, as you can tell, but you avoid having to meet your local fire crew on less than ideal terms (although I'm sure they're great).

    One issue some people may have to this recipe is the natural aversion to eating burnt things. Over cooked burgers, failed Thanksgiving turkeys, pies forgotten in the oven, the record of "burnt" food is pretty poor. The beauty of blackened foods, though, is that the spices were purposely chosen for their low burning temperatures. Combined with the milk solids present in the butter (which is why butter is used to do this), you end up getting a burnt crust that actually protects the meat from drying out and burning itself. The result is a juicy, fully cooked inside, with a crispy spicy outside.

    Ok, so there's a recipe. I've got some less outlandish ones in the pipeline now that I pretty much know will work, and my beer should hopefully be done in another week or so, so look out for that one.

    Cheers,
    Mike

Monday, June 1, 2009

Salmon Burgers

Having been born and raised on the east coast, seafood was a normal part of my diet. I can remember quite fondly going to Long Island to see my grandparents, going out to some restaurant that may or may not exist any more, and surprising my grandfather as I ate all sorts of assorted sea creatures with nary a thought. At family gatherings, if there was a fish on the menu, it was usually on my plate. I'm fairly certain that out of nearly 30 some odd dinners on cruises, I had seafood as my main course for at least 25 of them. Mako shark, swordfish, whitefish, red fish, squid, octopi, clams, mussles, oysters, shrimp, crabs, lobster, frogs (not technically seafood but aquatic none the less) I've eaten and enjoyed them all (some more than others depending on how they were cooked).

So, imagine my sense of awe when 5 years ago I went to visit Oregon State University in Corvallis, and discovered the salmon burger. All I could say was "where have you been all my life!?!" Thankfully, with the rise of Trader Joes, Whole Foods, and even the organic section of your local grocer, these tasty treats are available nearly every now. Unfortunately, I'm still a grad student on a budget, and paying $6 for 4 burger is a little steep. So channelling all of the culinary MacGyver vibes I could, I set out this weekend to make my own.

TbF Images - 309


It may not be the prettiest girl at the ball, but I wouldn't have any other. (Ok, I'd never pass on a store bought one, but thats not the point here). They're rather like making normal hamburgers from ground beef, only different. Since beef has lots of fat, its normally pretty sticky. Salmon is much much leaner, so you'll actually need to add some fat in to help bind things together. Don't worry though, as opposed to the saturated fats in beef, we're going to stick to relatively healthy olive oil. Combine that with the health benefits salmon normally brings to the table, and I think salmon burgers should be looked at as the new replacement for the hamburger. Or not...

Salmon Burgers:
1/2 pound chunk salmon, de-boned and de-skinned
1/4 cup red onion, finely diced
1/4 cup prepared mustard (coarse grain or dijon is best)
2 tbsp. ketchup*
2 tsp. prepared horseradish*
2 tbsp. olive oil
1/4 cup panko bread crumbs
1 tbsp. mustard powder
2 tsp. dill weed
1 tsp. celery seed
1 tsp. salt
1 tsp. ground pepper

*You can use cocktail sauce instead of the ketchup and horseradish if you prefer
  1. Shred salmon into fine pieces with a fork, or pulse quickly in a food processor.
  2. Add the onion and spices and combine thoroughly. Its easier to get all of the salmon integrated with the spices now than after adding the wet works.
  3. Add the wet ingredients, mixing thoroughly. Work the panko in with your fingers to distribute.
  4. Using your hands, grab a bit of the salmon mix just bigger than a golf ball and form into a pattie in your hands. Place on a square of parchment or wax paper, lay another square on top, and continue till you've used up all the mix. Freeze all of the patties you don't plan on using right then.
  5. To cook, heat a griddle pan over medium heat and lightly spray with no-stick spray. When the pan is hot, add the pattie and let cook for about 2-3 minutes a side. Salmon, being a lot lighter than beef, cooks much quicker and you don't want to cook it to the point of drying out. Serve on a bun with a little lettuce, an onion slice, some cheddar, and either some mustard or cocktail sauce (or both!).


TbF Images - 305
Ok, it does look a bit like cat food, but then again, ground beef doesn't look that appetizing when sitting raw in a bowl either.


TbF Images - 308
Fresh off the griddle, prior to being crowned and consumed.


While these may never replace that memory of the first time boy met salmon burger, for being a lot less than 50 cents a piece, I'm perfectly happy with how these babies turned out. And with the money I'm now saving by not buying salmon burgers from Whole Foods, I can afford to make a new beer! Yup, you heard me right, I'm making a new beer, and this time its not from a kit, so be prepared for some home brewing related posts coming up soon.

Cheers,
Mike