Sunday, May 17, 2009

Tabbouleh

So, my last couple of posts have mostly centered around generally unhealthy foods (potato chips, ice creams, tempura, mac & cheese, etc.). And while all those foods are great, they are generally lacking when it comes to the type of balanced nutrition that active people really need to keep themselves going. Fortunately, the focus of this post is on an incredibly healthy and extremely tasty dish from the middle east that also happens to be rather popular in some South American countries as well. Its tabbouleh!

Tabbouleh is made with an odd form of wheat, bulgur, thats been parboiled, dried, and packaged. The parboiling means that it cooks quickly later and since its a whole grain it packs a nutritional wallop, so its super quick and healthy. Along with the bulgur, tabbouleh combines massive amounts of parsley, some mint, some tomatoes, green onion, spices, and a very light splash of olive oil and lemon juice. Since I pretty much just gave you the ingredients, I'm going to do the method mostly in pictures.

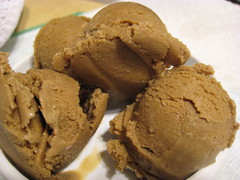
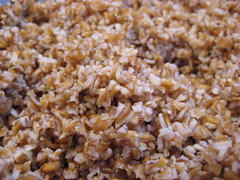
Step 1: Add 2 cups of water to 2 cups of bulgur wheat. Let the bulgur soak up all the liquid, it will take about an hour.
TbF Images - 282


Step 2: While the bulgur is doing its thing, chop up two firm tomatoes finely, almost as fine as like making salsa.
TbF Images - 279


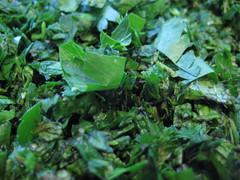
Step 3: Throw a whole bunch (literally, one whole bunch from the supermarket) of parsley and a small handful of mint leaves into your food processor and pulse till finely chopped.
TbF Images - 280


Step 4: Slice up 4 or 5 green onions.
TbF Images - 281


Step 5: Combine all of the above and 1/2 tsp. sea salt, 1/2 tsp. freshly ground pepper, and 1/2 tsp. cumin. Let sit refrigerated for an hour to get the flavors mingling.
TbF Images - 283


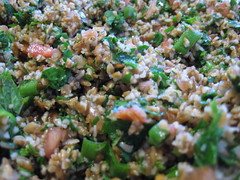
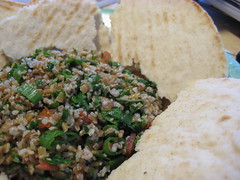
Step 6: Add 1/4 cup olive oil and 1/4 cup lemon juice, mix thoroughly, and either serve straight away or keep in the fridge for up to a week. I eat my tabbouled like a dip with some pita flatbread that you'd use for an gyro, but the traditional method is in a lettuce leaf. Either way its darn good.
TbF Images - 287


You may notice that after the bulgur has soaked up all the original liquid, its still a little hard. Don't worry, after you mix everything else in and let it sit, it will come out nice and chewy in the end. Aside from having a high amount of fibre, there's a decent amount of iron and other minerals which makes tabbouleh a great way to even out the deficiencies of the rest of your diet. It may not take the place of a full meal, but it would make a wonderful afternoon snack or accompaniment to a sandwich for lunch. Really, no matter where you include tabbouleh in your diet, you can't really loose.

Cheers, Mike

Sunday, May 10, 2009

Chips, Kettle-esque

Potato chips have become something of an oddity lately. Mass marketed for decades as an increasingly inferior and unhealthy snack food, they've recently moved upscale with the advent of small batch "boutique" brands using different cooking methods, oils, and potatoes. In the end though, they're still the same thinly sliced fried potato product originally developed back in 1853. What's the real shame with current mass market potato chips though is that no matter how hard you try, you'll never get a bag that tastes as fresh as when they're straight from the fryer. So I'm here to help everyone experience that little bit of joy.

Home Made Potato Chips:
2 qts. frying oil
4 large russet potatoes (cleaned and dried)
salt or other seasonings
  1. Slice the potatoes as thin as you can get them with a large, sharp knife, or to the thickness of a dime if using a mandolin. Spread the slices out onto some paper towels and heat the oil to 350F.
  2. When the oil is at the right temperature, add 8 or so slices at a time and keep them moving with a fine mesh strainer. It will take about 3-5 minutes for them to turn nice and golden brown. At that point transfer the chips to a bowl lined with some paper towels and toss to remove excess oil. Sprinkle in your seasoning and then transfer to some paper towels on a counter.


TbF Images - 273
Potato slices before frying.

TbF Images - 271
Frying up long cut slices, they carry more seasoning.

TbF Images - 274
Freshly fried chips, lightly seasoned with sea salt, seconds before being consumed.


As I said in previous posts, once I've got my dutch oven filled with oil, I know I have another 3-4 fry sessions left before the oil should be discarded (or turned into biodiesel, but thats not my area). Since its a pain to filter and store it in between these runs, I enjoy finding excuses to fry things since it's not one of my standard cooking methods. These chips went perfect with the hotdogs and cole slaw I had for dinner earlier this week. Unfortunately for my taste buds, but fortunately for my waistline, this was the final session with this oil, so I doubt I'll be deep frying anything else for a little while. But that means more variety of recipes for you guys, so there's some good that comes out of it.

Cheers, Mike

Sunday, May 3, 2009

Coffee ice cream

Who says you can't have ice cream for breakfast? Since bacon and eggs ice cream doesn't sound too appealing (although it has been done and I've never actually tried it) I think I'll stick with coffee ice cream for now (full disclosure, this past week my breakfast consisted of raspberry acai sorbet, but thats healthy because it has fruit... right?). Now, most coffee ice cream recipes I've seen say something along the lines of make your standard vanilla ice cream custard base, then add some espresso powder or instant coffee before you pour the mix into your ice cream makers. I thinks that's simply cheating... coffee ice cream should have coffee as its main ingredient and not an afterthought! The problem, though, is that coffee as you drink it is really just water, and adding coffee grounds to an ice cream base would result in a grainy, disgusting disappointment.

This is where a little science comes into play. You see, when you brew coffee normally, you're using heat as part of the mechanism for extracting all of the lovely flavors and aroma's that you expect from a normal cup of coffee. The reason isn't so much because heat is the best method for doing so, its simply because we don't feel like waiting. Heck, espresso was invented simply as a method for making coffee even faster than it already took. But if we have some time on our hands, we can achieve the same results without heat. And without relying on heat, we no longer need to stick to water as our sole extraction liquid. Now, you may be thinking that I'm suggesting alcohol, and you can extract flavors this way, which is how vanilla, mint, nut, and numerous other flavorings are extracted. But I figured why add more ingredients than necessary, infuse the milk!

Thats right, I directly infused the coffee into the milk before making the custard base. Its similar to cold brewing coffee but takes twice as long and obviously needs to be done in the fridge. Using whole milk over half and half sacrifices some of the richness that you lose from having less fat, but makes filtering later much easier and quicker. As far as purity goes, its hard to beat a recipe that has only 5 ingredients.

Coffee Ice Cream:
2 qts. whole milk
2 cups coarsely ground coffee
6 egg yolks
2 cups sugar
1 good pinch salt
  1. Add the coffee grounds to the milk in a big enough container (a 1/2 full gallon jug of milk works best) and place in your fridge for at least two days, giving it a shake every few hours if possible. After the infusion period (mine was 4 days simply because it was, 2 days works just as well) strain the milk through a coffee filter into a receiving container and then transfer to a large sauce pan over medium-low heat.
  2. Add the egg yolks, sugar, and salt in a heat proof work bowl and whisk until creamy. Add 1 cup of the warm milk slowly to the eggs while constantly whisking to temper. Add one more cup of warmed milk, whisking till thoroughly combined and then pour the whole mix back into the sauce pan.
  3. Heat over medium-low heat until the mixture gets thick enough that it will coat the back of a spoon and drawing your finger through it will leave a clean area. This is the standard custard method for ice cream bases so learn to recognize this point. When thickened, pour the custard through a fine mesh strainer into a large enough container and chill in your fridge for a few hours.
  4. Pour the chilled custard mixture into your ice cream maker and let it go for about an hour or follow the manufacturers instructions. Pack into containers and put in your freezer to harden.

TbF Images - 269
Whisking the eggs and sugar before adding the heated milk to temper. Be careful to slowly add the heated milk so you don't make scrambled eggs!

TbF Images - 279
Small scoops may disappoint some, but see below for my ultimate serving suggestion.


So, there we go, coffee ice cream without resorting to espresso powder or instant coffee. The direct infusion of the milk method works for other flavors as well, but thats another post now isn't it. As I said above, this is the perfect excuse for any coffee drinker to have ice cream for breakfast, but what about those who just can't get the day started without a stop at Starbucks? Here's my advice: get a small coffee cup (or a large one if you really wish) and fill it with small scoops of coffee ice cream. Drizzle caramel syrup and hot fudge on top, then add some chopped walnuts and a dollop of whipped cream. Voila, turtle mocha sundae! Now thats a cure for a case of the Mondays.

I've got a whole back-log of ice cream recipes now, but I'll try to space them out with some other tasty items.

Cheers, Mike.