After my mother contacted me suggesting that I change the term bias in the last post because its too technical, and I subsequently explained that semi-technical terms are not only a part of my style but the best terms to use in this case, I've decided to acquiesce to a small degree (yes, I know thats somewhat redundant) and provide a link to the Better Homes and Gardens Cooking Glossary. If you ever come across a word on this or any other blog or food show that you don't know, BHG is probably the place to look it up.
Happy Cooking :)
Friday, January 23, 2009
Wednesday, January 21, 2009
Ham and mustard greens soup
If pressed, I'd admit that buying a 9 lb. ham for one person seems excessive, even if it was half price. But the best part about having a lot of a single cheap ingredient is that it forces you to be creative. Unfortunately, a giant ham thats been cooked twice (city hams are pre-cooked when you buy them don't forget) has few creative options as far as real food goes. Sure, there's the inevitable ham sandwich, ham and eggs, ham soup, um... I think thats it really.
Not feeling the creative juices flowing, and it being three billion below 0, soup actually sounded like a good idea. I could have gone and made a ham and bean soup like so many other families do, but I figured that the ham would be more than enough protein and thus nixed that idea. Having bought some mustard greens a few days earlier (I'm currently on a mission to cook every green leafy vegetable I can find this year) I decided on a ham and mustard green soup. Having made some lovely pork stock from the hock (the bone of the hame) and the traditional celery/onion/carrot combo, and having some chicken stock left, I decided that all I needed to pick up were some mushrooms and I'd be on my way.
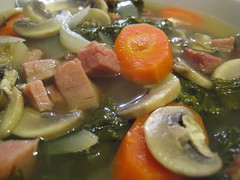
Ham and mustard greens soup:
1 lb. ham, cubed
1 bunch mustard greens, cleaned, de-stemmed, and chopped
2 carrots, sliced on the bias
1/2 onion, chopped
1 cup sliced mushrooms
1/2 cup white wine
1 clove minced garlic
8 cups pork stock
1 tbsp. fresh ground coriander
1 tbsp. freshly ground pepper
2 tsp. salt (depending on your stock/broth you'll need moreof or less)
1. Place your soup pot over medium heat and add the wine.
2. When the wine just begins to steam, add the garlic, onion, carrot and greens. Cook until the greens have shrunk considerably and the onion is translucent.
3. Add the ham, stock and coriander and cook for 30 minutes till the carrots are tender.
4. Add the mushrooms and cook a further 10 minutes. Season with salt and pepper as needed/desired.
Notes: I only had 4 cups of pork stock, so I used 4 cups of chicken stock as well. The flavor is a bit mixed since my chicken stock was stronger than the pork stock. Still good though.
Not feeling the creative juices flowing, and it being three billion below 0, soup actually sounded like a good idea. I could have gone and made a ham and bean soup like so many other families do, but I figured that the ham would be more than enough protein and thus nixed that idea. Having bought some mustard greens a few days earlier (I'm currently on a mission to cook every green leafy vegetable I can find this year) I decided on a ham and mustard green soup. Having made some lovely pork stock from the hock (the bone of the hame) and the traditional celery/onion/carrot combo, and having some chicken stock left, I decided that all I needed to pick up were some mushrooms and I'd be on my way.
Ham and mustard greens soup:
1 lb. ham, cubed
1 bunch mustard greens, cleaned, de-stemmed, and chopped
2 carrots, sliced on the bias
1/2 onion, chopped
1 cup sliced mushrooms
1/2 cup white wine
1 clove minced garlic
8 cups pork stock
1 tbsp. fresh ground coriander
1 tbsp. freshly ground pepper
2 tsp. salt (depending on your stock/broth you'll need more
1. Place your soup pot over medium heat and add the wine.
2. When the wine just begins to steam, add the garlic, onion, carrot and greens. Cook until the greens have shrunk considerably and the onion is translucent.
3. Add the ham, stock and coriander and cook for 30 minutes till the carrots are tender.
4. Add the mushrooms and cook a further 10 minutes. Season with salt and pepper as needed/desired.
Notes: I only had 4 cups of pork stock, so I used 4 cups of chicken stock as well. The flavor is a bit mixed since my chicken stock was stronger than the pork stock. Still good though.
Sunday, January 18, 2009
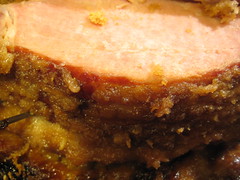
Ham with spiced crusty glaze
Ah the holidays, the few times of year when families and friends come together and gorge themselves on a large piece of cooked meat (and vegetarians/vegans grumble that everyone else around them are a bunch of neanderthals). Either way, my favorite time of the year, culinarily speaking, is after the holidays. If you've read my earlier posts, you already know I'm all about managers specials. And the post-holidays are some of the best times to pick up what would normally be a rather expensive piece of meat on the cheap. This time I found myself a 9 lb. bone in ham... booyah!
Now, hams come in many styles, but they're primarily divided by the way they've been treated. Country hams are generally smoked while city hams get brined. Either method preserves and flavors the meat while simultaneously cooking it. Thats why nearly all ham on the market can be eaten straight from the package. No matter which type of ham you get though, it can always use some extra flavoring. This is where things get tricky as there are thousands of different ideas for how to cook a ham. In the south the traditional treatment is with cola. My aunt (the hamstress of my extended family) follows the instructions on the package. Many people use honey and brown sugar, either on their own or from the "glazing packet" that came with the ham. And there's the crust group, who use an assortment of spiced/sugary "breadings" (generally ground cookies) to give their hams flavor. I decided to join this last group for my ham.
It started by looking at what Alton Brown did on Good East, cook the ham then coat with mustard, then brown sugar, then ground spice cookies. Well, I didn't feel like wasting the little bit of mustard I had left since I'd be using it for the inevitable ham sandwiches. And I didn't feel like making gingersnaps just to put them on a ham. So I looked in my pantry for fill-ins: brown sugar, honey, nutmeg, ground cloves (well, whole cloves ground myself), panko, and about 1/3 of a bottle of Captain Morgan's spiced rum. Well, that all certainly sounds good and proper.
Ham with spiced crusty glaze:
1 city/picnic ham, pref. bone in
1 cup brown sugar, divided
1 cup panko bread crumbs
1/2 cup honey
1 tsp. ground cloves
1 tsp. ground nutmeg
Enough rum for the ham and yourself (ham requires ~1/2 cup)
1. Put the cut side of the ham facing down in your roasting pan and turn the oven on to 375F.
2. Melt the honey in the microwave until its syrup. Using a silicone brush, spread the honey all over the ham till evenly coated. Should use about 1/2 the honey.
3. Mix half of the brown sugar with the nutmeg and cloves and pat over the ham to coat. Apply the rest of the honey to the ham.
4. Mix the panko with the rest of the brown sugar and pat onto the ham till evenly coated (you probably won't need all of it).
5. Put some rum in either a very clean spray bottle or a water bottle and thoroughly wet the panko.
6. Put a probe thermometer in the ham, making sure not to hit the bone. Put the ham in the oven till the thermometer reads 135F.
Now, there are two things you can do after the ham hits the desired temp. You can pull it out and enjoy as is like I did, or you can wet the crust (the top will probably have dried out some instead of caramelizing) and boost the oven to 450F to really caramelize it (should take less than 10 minutes and won't dry your ham out as long as you don't remove the thermometer probe or shift the ham in the pan).
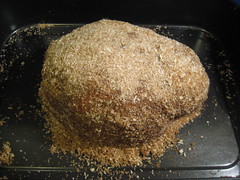
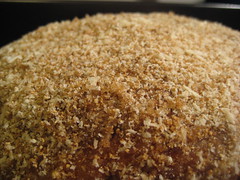
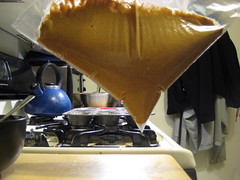
Ham before getting its rum bath.

Close-up of the crust before the rum application.
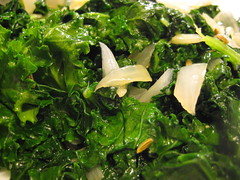
I paired the ham with some fresh kale that I sauteed with onion and fennel seed, yummy.
Now, hams come in many styles, but they're primarily divided by the way they've been treated. Country hams are generally smoked while city hams get brined. Either method preserves and flavors the meat while simultaneously cooking it. Thats why nearly all ham on the market can be eaten straight from the package. No matter which type of ham you get though, it can always use some extra flavoring. This is where things get tricky as there are thousands of different ideas for how to cook a ham. In the south the traditional treatment is with cola. My aunt (the hamstress of my extended family) follows the instructions on the package. Many people use honey and brown sugar, either on their own or from the "glazing packet" that came with the ham. And there's the crust group, who use an assortment of spiced/sugary "breadings" (generally ground cookies) to give their hams flavor. I decided to join this last group for my ham.
It started by looking at what Alton Brown did on Good East, cook the ham then coat with mustard, then brown sugar, then ground spice cookies. Well, I didn't feel like wasting the little bit of mustard I had left since I'd be using it for the inevitable ham sandwiches. And I didn't feel like making gingersnaps just to put them on a ham. So I looked in my pantry for fill-ins: brown sugar, honey, nutmeg, ground cloves (well, whole cloves ground myself), panko, and about 1/3 of a bottle of Captain Morgan's spiced rum. Well, that all certainly sounds good and proper.
Ham with spiced crusty glaze:
1 city/picnic ham, pref. bone in
1 cup brown sugar, divided
1 cup panko bread crumbs
1/2 cup honey
1 tsp. ground cloves
1 tsp. ground nutmeg
Enough rum for the ham and yourself (ham requires ~1/2 cup)
1. Put the cut side of the ham facing down in your roasting pan and turn the oven on to 375F.
2. Melt the honey in the microwave until its syrup. Using a silicone brush, spread the honey all over the ham till evenly coated. Should use about 1/2 the honey.
3. Mix half of the brown sugar with the nutmeg and cloves and pat over the ham to coat. Apply the rest of the honey to the ham.
4. Mix the panko with the rest of the brown sugar and pat onto the ham till evenly coated (you probably won't need all of it).
5. Put some rum in either a very clean spray bottle or a water bottle and thoroughly wet the panko.
6. Put a probe thermometer in the ham, making sure not to hit the bone. Put the ham in the oven till the thermometer reads 135F.
Now, there are two things you can do after the ham hits the desired temp. You can pull it out and enjoy as is like I did, or you can wet the crust (the top will probably have dried out some instead of caramelizing) and boost the oven to 450F to really caramelize it (should take less than 10 minutes and won't dry your ham out as long as you don't remove the thermometer probe or shift the ham in the pan).
Tuesday, January 13, 2009
Behind the Blog: Smore Cupcakes
Welcome to the first of what I'm thinking may become a regularish feature here on TbF. If you're like me, you've probably wondered how all those food bloggers you follow come up with a recipe and why it seems so easy and delicious that you never though of it yourself. Well, not to ruin things for myself, but I'm going to give you all a glimpse at how this latest recipe came about.
Back in the beginning of December, Rachel Rappaport at Coconut & Lime did a post about a toasted marshmallow frosting. Since it was right after Thanksgiving, she used it on top of sweet potato cupcakes. Good pairing, but I figured people had enough sweet potatoes with marshmallow and had grander ideas... smores (also known as s'mores). Smore cupcakes to be exact. Now, my first inclination was to check out Vanilla Garlic to see if Garrett had already posted a recipe. Well, he has a graham cracker type cupcake, but in my opinion he cheated by using graham cracker crumbs (sorry Garrett, nothing against you). I wanted to go fully from scratch (I know, a bit masochistic baking wise, but its my nature). Next try was google, and again, nothing going, people either used a chocolate cake topped with marshmallow and graham cracker crumbs or used pre-made graham crackers in the cake. Seems like a recipe for smore cupcakes from scratch is up to me to create...
The problem is, coming up with something that no one else has before is a bit of a challenge. The first, and most obvious question is where to start? Should I modify a cupcake recipe with graham cracker ingredients (what exactly are graham cracker ingredients?) or do I modify a graham cracker recipe into a cupcake (do people even make their own graham crackers?) I decided I needed to look into what goes into actual graham crackers before anything else. Quick search on google and I was on Alton Brown's page on Foodnetwork.com looking at his recipe for home made graham crackers (apparently I missed that episode even though it only aired last fall).
Anywho, his first ingredient was graham flour. Never having heard of the stuff, I wondered how expensive that might be (I figured it would be one of those specialty flours I'd have to buy at Whole Foods). Turns out Hodgson Mill, a rather widely available (i.e. at your local supermarket) brand makes graham flour. Turns out its just wheat flour with the bran and germ left in from the milling process, neat! So, having the graham flour part down, and then seeing that the spices were rather pedestrian, I decided to go with the modify a cupcake recipe route.
So, I opened up my recipe database (yeah, real nerds have recipe databases on their computers... ok... normal people do too) and pulled up my vanilla cupcake recipe.
Try 1: For the first trial I replaced all the flour with the graham flour, and kept everything else the same with the exception of adding in cinnamon and nutmeg. To make it smore-like, I thought I'd break some Hershey bars into the squares and place a square in each cupcake prior to baking. Well, the chocolate turned out ok, although it was weird having a big hunk in the middle of the cake. The big problem was that the cake didn't taste very graham crackery (sounds like weird British slang... crackery) and one person even compared it to sand, which is always the sort of review you're looking for. Back to the drawing board I guess.
Try 2: For the second go I dropped back on the graham flour (it is a whole grain wheat, which is probably what made it so dry the first time) and went with a cup of white and a cup and a half graham. I also dropped the oil content of the original recipe to 2 ounces, boosted the milk to 4.5 ounces, and replaced the remaining 1.5 ounces with molasses. The result this time was close, but the flavor still wasn't there, even if the texture was much improved.
Try 3: This time I played around with the spices more than the previous attempts, keeping the rest of the mix the same. I bumped the cinnamon up to a tablespoon from a teaspoon and doubled the nutmeg to a teaspoon. The results were closer, but I used a different brand of molasses and the burnt taste that comes from a strong, dark molasses was a bit overpowering to the rest of the flavors.
Try 4: This ended up being the version that I posted, although I'm still not quite satisfied with it (is anyone ever truly satisfied with one of their own creations?) I skipped the molasses in total due to the variability between brands and went completely with dark brown sugar over my normal light brown to make up for it. I also added some ginger paste on a whim to try and give the cake a little bite and warmth that I hoped would make the smore experience more realistic. Some people said the ginger was too noticeable, others didn't notice it at all. Guess it depends on who you are.
So, there you all have it. 4 batches of cupcakes made. One (not yet?) final recipe. I think I may try these again next month, because I have some other ideas to improve them, but for now, its on to more savory eats. Here a sneak peak of what's on tap for my next post (to hopefully be up, on time, this weekend).
Monday, January 12, 2009
Smore Cupcakes!
I'm posting just the recipe in this post because I plan on doing a rather long post about how the recipe came about and so forth, and I figure that those who don't want to read all of that should still be able to enjoy cupcake goodness.
The smore cupcake is a graham cracker cake, with some chocolate baked into the cupcake itself, then iced with a chocolate ganache, followed by icing with marshmallow frosting which is then toasted. Pure indulgent goodness.
Smore Cupcake:
1 cup AP flour
1 1/2 cups graham flour
2 tsp. baking powder
1/2 tsp.bicarb baking soda
1/2 tsp. salt
3 oz. canola oil
4 1/2 oz. milk
1 tsp. vanilla
1 stick butter room temp
1 cup dark brown sugar
3 eggs
1 tbsp. cinnamon
1 tsp. nutmeg
1 tbsp. ginger paste
1. Preheat oven to 350 F. Line 20 muffin cups (I always seem to get 18 when filling the cups 3/4 full).
2. Whisk together the flour, baking powder and soda, salt, cinnamon, and nutmeg in a small bowl. Combine the milk, oil, and vanilla in a measuring cup.
3. Cream butter with the sugar in a large mixing bowl until fluffy. Add the eggs, 1 at a time and continue beating. Add the ginger paste and mix till incorporated.
4. Add dry and wet mixes in batches, beginning and ending with the dry. Mix just until blended through.
5. Transfer mix to a gallon ziploc bag, snip an end, and pipe into cups. Add a few chocolate chips to the tops in the center and bake for ~15 minutes. Cool completely before frosting.
Chocolate Ganache:
3 oz. milk chocolate
1 oz. cream
1/2 tsp. corn syrup
Place the cream and corn syrup in a small bowl and microwave for 30-45 seconds. Place chocolate in another small bowl and microwave for 25 seconds. Pour some of the cream/corn syrup mixture over the chocolate and let sit for 1 minute. Mix well till the chocolate is glossy. If you need more of the cream mixture, add it 1/2 tsp at a time. You want the ganache to set up fairly firm but still be easy to spread and bite through.
Marhsmallow Frosting:
See this post over at Coconut & Lime
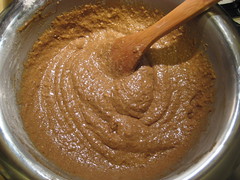 Mix up the batter, then transfer it to a gallon bag.
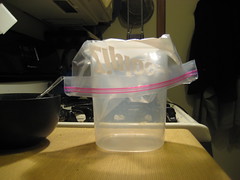
 Its much easier to pipe the batter than to spoon it in.
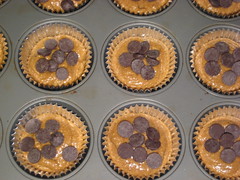 Add some chocolate chips to the top of the batter before baking so you get some chocolate incorporated into the cupcake and not just on top.
 When the cupcakes are cool, apply the chocolate ganache and allow to set up firm.
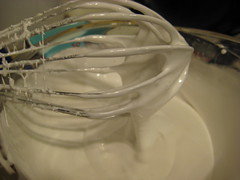 While the ganache is setting, whip up the marshmallow frosting. You want it fairly firm but still easily spreadable.
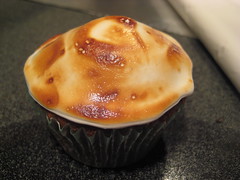
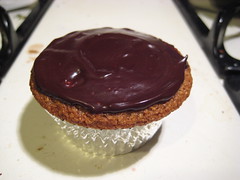
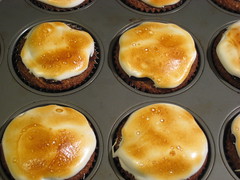 Apply the marshmallow frosting to the cupcakes. I found it easier/safer to transfer them back to the muffin pan and then apply the blowtorch.
The smore cupcake is a graham cracker cake, with some chocolate baked into the cupcake itself, then iced with a chocolate ganache, followed by icing with marshmallow frosting which is then toasted. Pure indulgent goodness.
Smore Cupcake:
1 cup AP flour
1 1/2 cups graham flour
2 tsp. baking powder
1/2 tsp.
1/2 tsp. salt
3 oz. canola oil
4 1/2 oz. milk
1 tsp. vanilla
1 stick butter room temp
1 cup dark brown sugar
3 eggs
1 tbsp. cinnamon
1 tsp. nutmeg
1 tbsp. ginger paste
1. Preheat oven to 350 F. Line 20 muffin cups (I always seem to get 18 when filling the cups 3/4 full).
2. Whisk together the flour, baking powder and soda, salt, cinnamon, and nutmeg in a small bowl. Combine the milk, oil, and vanilla in a measuring cup.
3. Cream butter with the sugar in a large mixing bowl until fluffy. Add the eggs, 1 at a time and continue beating. Add the ginger paste and mix till incorporated.
4. Add dry and wet mixes in batches, beginning and ending with the dry. Mix just until blended through.
5. Transfer mix to a gallon ziploc bag, snip an end, and pipe into cups. Add a few chocolate chips to the tops in the center and bake for ~15 minutes. Cool completely before frosting.
Chocolate Ganache:
3 oz. milk chocolate
1 oz. cream
1/2 tsp. corn syrup
Place the cream and corn syrup in a small bowl and microwave for 30-45 seconds. Place chocolate in another small bowl and microwave for 25 seconds. Pour some of the cream/corn syrup mixture over the chocolate and let sit for 1 minute. Mix well till the chocolate is glossy. If you need more of the cream mixture, add it 1/2 tsp at a time. You want the ganache to set up fairly firm but still be easy to spread and bite through.
Marhsmallow Frosting:
See this post over at Coconut & Lime
Monday, January 5, 2009
Quick look to the future:
With the new year comes the inevitable resolutions list, but I figure you get enough of those from pretty much everyone else on Earth that I'll pass on posting mine. What I will do, however, is give you all a glimpse at my 2009 goals/plans for this blog.
Firstly, I've got a semi-major site redesign in mind. I'm hoping to have it officially rolled out by the end of the month, but no promises. Second, I'm going to try and do at least one post per week, depending on what else may come up fo course. And third, I'm hoping that I can do a few posts on "food policy" topics that might be longer but hopefully insightful (I don't profess to be an expert, but I do work with a number of them).
Stay tuned at the weekend for a new recipe, and have a great 2009 everyone!
Subscribe to:
Posts (Atom)